Know the tree ordinances in your local jurisdiction
Some cities and counties prohibit planting certain invasive tree species or require permits to remove existing trees that you might be replacing. You should also confirm whether your planting site is on your private property or in the public right-of-way (e.g. side walk planting strip). When planting in the public right-of-way, you may need approval from your local jurisdiction first.
Canopy directly partners with with the jurisdictions below, but you can search your own city or county website to find information for your community:
Before planting, carefully consider tree selection, placement and site conditions. Consult the Canopy Tree Library and other selection resources for tree suggestions and requirements.
Large trees provide maximum urban forest benefits; plant them where there is room to grow. Always consider the tree’s size at maturity, especially when you are near powerlines or other permanent hardscape features. Plant small or medium trees where there is limited space for roots and growth.
When to plant: The optimal planting season in our region is when the weather is wet and cool, from late-October to mid-March. Trees planted during the hot summer months require more water to establish and have a lower survival rate.
Call before you dig
To ensure your tree and planting hole will not conflict with local utilities, call USA North at 811 or 800-227-2600. They will inspect your site and mark any utility conflicts.
Canopy’s proven tree-planting techniques:
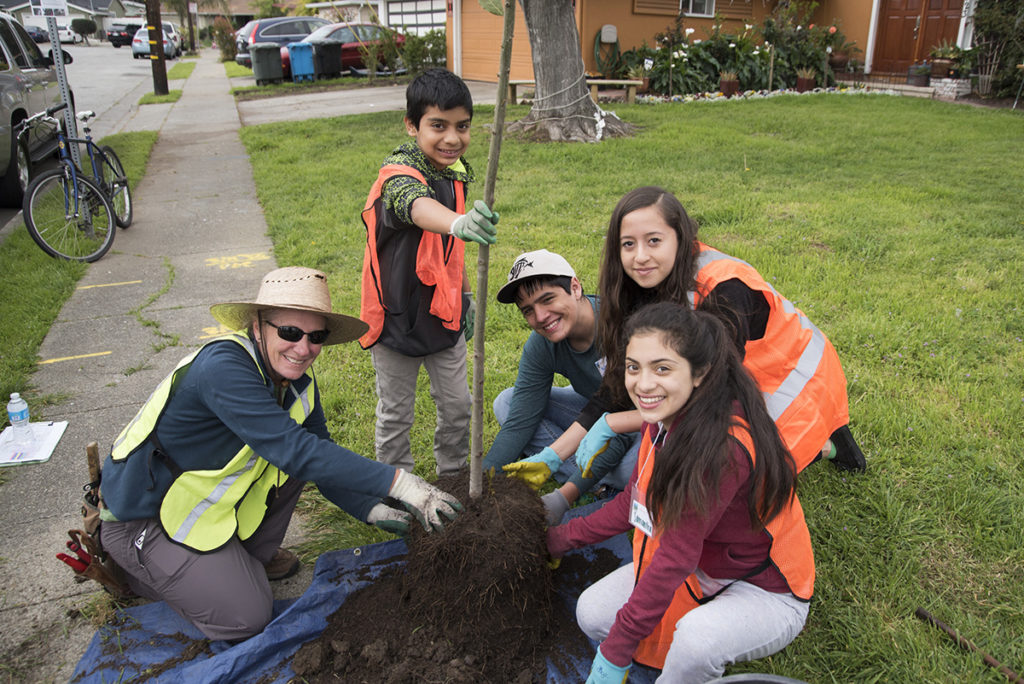
Dig the planting hole just as deep as, and 2-3 times as wide as, the root ball (the mass of soil and roots that comes out of the container). It is very important that the root flare (the point where trunk widens and becomes roots) remains above the surface of the soil. Remove the container and measure the root ball with the handle of your shovel to estimate the depth to dig. To prevent air pockets below the tree, create a small mound of soil in the base of the hole like a pedestal, and tamp down firmly. This will prevent the tree from settling. Make sure to score the sides of the hole by taking the blade of the shovel and running it vertically along the hole walls, especially if soil is hard clay or compacted.
Massage/loosen/trim the roots and remove the nursery stake. We have found that this step is key to robust tree performance. Roots should ideally radiate out straight from the center of the root ball. Lay the tree on its side with the root ball on a tarp and work gloved fingers in deeply to loosen and free the roots. Cut off any circling roots to prevent girdling (when circling roots get bigger, grow around the base of the tree and cut-off the flow of water and nutrients to other parts of the tree). This is a good time to cut the green ties and remove the nursery stake.
Place the tree in the center of the hole. The tree has only one chance to be planted properly so make sure the depth and position is correct before filling in the soil. With your fingers, dig around the base of the tree to find the first woody root. The first woody root should lie ¼ to ½ inches below the soil grade and the root flare should lie above the surface. If it is too low or too high, lift the tree out and add or remove soil as needed. Rotate the tree until you find the best placement to keep major branches away from walkways or buildings. Lastly, make sure the roots are splayed out in the hole to ensure that they grow outward properly. Hold the tree upright and fill in with soil around the root ball. Gently tamp down soil around the root ball with hands to eliminate air pockets. As you backfill, loosely shake the base of the tree to test the stabilization of the tree. The root ball should not move once the tree is completely covered with soil properly. Do not step directly on the root ball, as this will damage and compact the roots.
Build a soil berm(a soil mound encircling the tree which creates a basin that will hold water at the edge of the root ball). The inside of the berm should be at the outer edge of the root ball. Keeping the root ball moist is essential until the tree is established (establishment takes 3 -5 years).
Stake the tree. Two wooden stakes or one metal Reddy Stake™ (comes with installation instructions) are used to help the young tree grow up straight until the roots are established. In parks and yards, three stakes may be used to protect the tree from lawn mowers. Set the stake at the outer edge of the root ball, away from the trunk and hold straight. Lean the top of one stake down to easily slide the stake pounder onto the stake. Always wear a hard hat while using the stake pounder(a very heavy tool with two handles which fits over the end of the stake). Pound until the stake is firmly set and the pounder can easily be removed. Use extreme caution when removing the pounder from the stake. Repeat with the second or third stake spaced equally around the tree.
Tie the tree. Ties should be placed at the lowest point on the trunk that the tree can be held straight, generally about 4 feet from the ground. Hold the trunk at the level you plan to tie it; the tree should stand straight without leaning. Create a figure-8 pattern with the tie, one loop around the trunk and the other around the tree. Nail the ends of the tie together into the stake.
Add Top Mulch composed of wood chips, shredded bark or leaves. Cover the soil berm with 3-5 inches of mulch to retain moisture, suppress weeds and improve soil composition. Keep mulch 2-3 inches from the trunk and root flare of the tree to prevent fungi from growing on the trunk or in the root system, as well as preventing insects and rodents from burrowing in the mulch and chewing on the bark.
Water the tree thoroughly! Give the tree 10-15 gallons of water following the planting. Continue watering (once a week, 10-15 gallons) for the first 3-5 years.
WATCH: How to Plant a Tree Step-by-Step Guide
MIRE: Cómo plantar un árbol:
Request a Tree
Canopy partners with residents of neighborhoods that need community trees the most to offer free trees, tree care, and expert advice to grow urban canopy tree cover and invest in healthier communities.